

Last spring, one of my clients found her eleven-year-old tabby, Pumpkin, lying limp on the kitchen floor at six in the morning — no movement, no breathing, gums going gray. She’d taken a pet CPR class two years earlier, more out of curiosity than fear, and her hands remembered what her panicking brain nearly forgot: thirty compressions, two breaths, get to the car. By the time she carried Pumpkin through our clinic doors, his heart was beating again — weakly, but beating. He was diagnosed with hypertrophic cardiomyopathy (a thickening of the heart muscle that’s surprisingly common in cats), started medication, and spent another fourteen months sleeping on her pillow. “I don’t remember deciding to start,” she told me later. “My hands just did.” Stories like Pumpkin’s are rare, and I’ll be honest with you about exactly how rare before we’re done. But that’s precisely why I want every pet owner to understand pet CPR: you can’t look it up at the moment you need it. Here’s the walkthrough I give my own clients.
First, Confirm It’s Really CPR — Then Move Fast
Pet CPR is for a pet who is unresponsive, not breathing, and has no heartbeat. So before you start, run a fast three-part check — and I do mean fast, because brain injury can begin after just two to four minutes without oxygen.
- Responsiveness: Call your pet’s name loudly and tap or gently shake. No reaction? Move on.
- Breathing: Watch the chest. Here’s a trap I’ve seen catch even careful owners: gasping is not breathing. A German Shorthaired Pointer named Cooper was rushed to my clinic years ago because his owner saw his sides heaving and assumed he was breathing on his own. That open-mouthed, sporadic gasping — called agonal breathing — is a reflex, not effective respiration. It’s actually a sign to start CPR, not hold off.
- Pulse and circulation: The most reliable pulse point in dogs and cats is the femoral artery, on the inside of the thigh where the leg meets the body. Press gently with two fingers and count for five to ten seconds. You can also feel the apex beat — the heart’s thump — with your palm just behind the left elbow. While you’re there, lift the lip: healthy gums are pink, and if you press a finger on them the color should return within two seconds. Pale, white, or blue-tinged gums with a slow refill tell you circulation is failing.
If you can’t find a pulse and there’s no effective breathing, start compressions immediately and have someone else phone your emergency vet. If you’re alone, a minute or two of CPR before calling is reasonable — get some blood moving first. The [1] offer a solid quick-reference for these checks, and I’d encourage every owner to bookmark something like it.
Chest Compressions: Small Cats, Big Dogs, and Every Chest In Between
The heart of CPR is, well, the heart of it. Two numbers matter more than anything else: compress at a rate of 100–120 per minute (the tempo of “Stayin’ Alive,” if you hum it), and compress to a depth of about one-third to one-half the width of the chest. Pet chests come in wildly different shapes, though, so hand position changes with the animal.
Cats and Small Dogs
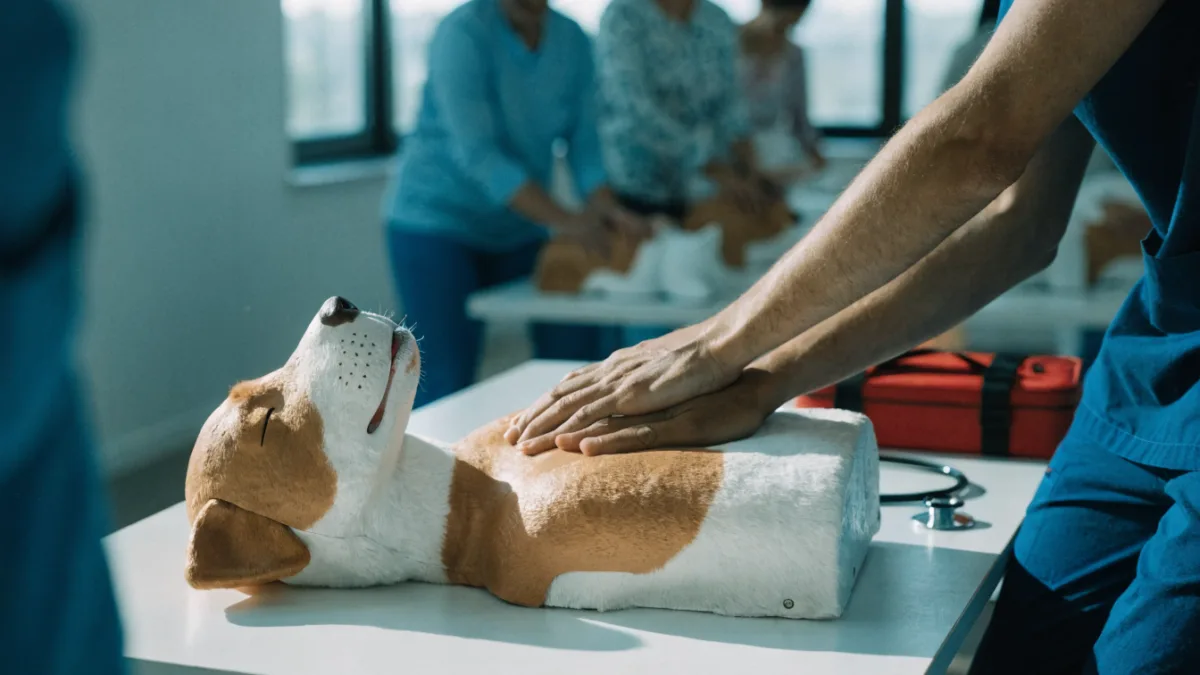
For cats and small dogs, you can encircle the chest with both hands — thumbs on one side, fingers on the other, pet upright or on its side — and squeeze. Alternatively, use the heel of one hand with the pet lying on its side. Even tiny chests need that one-third depth, which feels deeper than most people expect.
Medium and Large Dogs
Lay your dog on its side and place your hands stacked, one over the other, over the widest part of the chest — roughly the mid-chest, behind the shoulder. Keep your arms straight and your elbows locked, and compress with your upper body, not just your arms. Fatigue ruins good compressions, so let the chest fully rebound between pushes; leaning on it keeps the heart from refilling.
Keel-Chested and Barrel-Chested Breeds
Deep-chested breeds like Greyhounds, Great Danes, and Collies have hearts that sit lower and further forward, so current veterinary guidelines recommend compressing directly over the heart, just behind the elbow, while they lie on their side. Barrel-chested breeds like Bulldogs are the odd ones out: they can be placed on their back with compressions over the sternum, much like human CPR. The [2] illustrates these positions well if you’re a visual learner.
Rescue Breaths: Every Snout Is a Different Shape
Before delivering breaths, open the airway: gently straighten the neck, pull the tongue forward, and glance inside for an obstruction — a ball, a chunk of toy, a treat lodged at the back. (One caution from the cat side of my practice: if you see string or thread under the tongue, don’t pull it. It’s often anchored further down and pulling can cause serious internal damage; that’s a job for sedation and scissors at the clinic.)
Long Snouts
For most dogs, close the mouth, seal your mouth over the nose alone, and exhale for about one second — just until you see the chest rise. Two breaths per cycle. If the chest doesn’t rise, reposition the neck and try again before assuming obstruction.
Flat Faces and Cats
Here’s the detail that trips people up: Pugs, Bulldogs, Persian cats, and other flat-faced (brachycephalic) breeds — along with all cats — have noses too short to seal properly. For them, seal your mouth over the nose and mouth together and breathe the same way. I once had a client attempt CPR on her Pug, Gus, and get nowhere with breath after breath because she was trying to seal just his tiny nose. When she cupped his whole muzzle in her mouth, the chest finally rose. If you have a barrier cloth or thin gauze handy, using it is reasonable — disease transmission from pets to people this way is rare, but not zero.
The 30:2 Cycle — and Getting to the Professionals
Now put it together: 30 compressions, then 2 rescue breaths, then repeat, continuously. I’ll admit I’ve changed my mind on the order of operations here. When I trained, we were taught airway first, then breathing, then compressions. The RECOVER guidelines — the veterinary equivalent of the human resuscitation guidelines — flipped that logic, and rightly so: circulating blood matters most in the first minutes, so compressions come first. If two trained people are available, one keeps compressions going continuously while the other gives roughly ten breaths per minute, without pausing the compressions.
And please hear this part: CPR is a bridge, not a destination. It exists to keep oxygen moving to the brain and heart until a veterinary team can take over. Call your emergency clinic so they’re ready, and if a second person can drive, continue compressions in the car if you can do it safely. Stop only when your pet starts breathing and responds, when professionals take over, or when you’re physically exhausted — genuinely good CPR is exhausting, and that’s not a failure on your part.
One rule I’m strict about: never practice compressions on a healthy pet. Even gentle pressure on a beating heart can cause real harm. If you want your hands to know these skills — and you do — take a certified pet first aid course through an organization like the Red Cross. Practicing on a mannekin isn’t glamorous, but it’s what made the difference for Pumpkin’s owner.
Real Talk: What the Numbers Say
I promised honesty, so here it is. Fewer than one in ten dogs and cats who receive CPR survive to go home — studies generally land somewhere between two and ten percent, with better odds when the collapse happens in a hospital under anesthesia than out in the world. I share those numbers not to discourage you, but so you know that if you do everything right and still lose your pet, you didn’t fail. You gave them the only chance that existed. The Hill’s guide on [3] echoes the same point: this is a skill of last resort performed with hope, not a guarantee.
So here’s my takeaway, and my ask: the time to learn pet CPR is tonight, not during the worst morning of your life. Take a class once every couple of years, save your emergency vet’s number in your phone right now, and tape it to the fridge for everyone else in the house. Our pets spend their whole lives watching over us — resting a chin on our knee when we’re low, sounding the alarm when something’s wrong. Learning how to do CPR on a dog or cat is one of the few ways we get to return the favor when it counts. Be their first responder. They’d be yours.
Sources
- Canadian Red Cross first aid tips for dogs and cats — redcross.ca
- American Red Cross pet CPR guide — redcross.org
- how to do CPR on dogs and cats — hillspet.com