

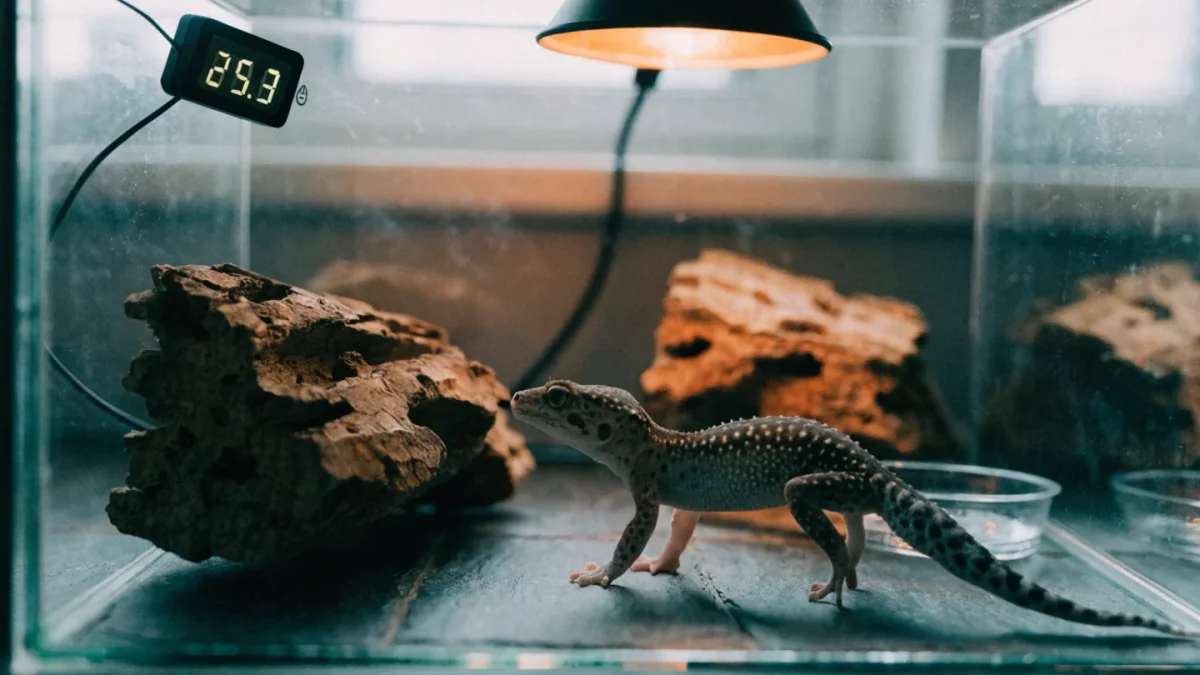
Forty dollars for the gecko. Three hundred for the setup. That ratio surprises people, but it shouldn't — the enclosure is where this animal spends its entire life, and cutting corners shows up fast. I've seen geckos kept in plastic tubs with a heat mat and nothing else. They survive. But survival isn't the bar we should be aiming for.
A well-built leopard gecko habitat setup needs five things working together: the right enclosure, regulated heat, proper hides, safe substrate, and stable humidity in the shedding zone. Miss any one of those and you'll end up treating symptoms instead of preventing problems. The full breakdown of temperatures and other care parameters is in the leopard gecko care guide, so I'll focus here on the practical build — what to buy, where to put it, and mistakes I see constantly.
Step 1: Choose the Enclosure
A 20-gallon long tank (30 x 12 x 12 inches) is the working minimum for one adult. A 40-gallon breeder (36 x 18 x 16 inches) is better — it gives you room for a real temperature gradient and enough floor space for enrichment. Front-opening terrariums beat top-opening aquariums. Leopard geckos interpret overhead movement as a predator, and reaching in from above every time you need to feed, clean, or interact defeats the trust you're building.
I switched my entire collection to front-openers about six years ago, and handling became noticeably easier within weeks. The geckos stop associating "hand from the sky" with danger.
Screen tops work for ventilation but let heat escape faster. If you're using a screen-topped aquarium, you'll need a stronger heat source to compensate, which introduces burn risk if the fixture sits directly on the mesh. Front-opening enclosures typically have partial screen ventilation on top — a better balance.
Step 2: Heating
Here's where most setups fail. The heat source matters less than the thermostat. I'll say that again: buy the thermostat first.
An unregulated heat mat will cook your gecko. An unregulated basking bulb will overshoot. A dimming thermostat takes the guesswork out by adjusting output continuously to hold your target temperature.
For the heat source itself, I prefer overhead halogen flood bulbs. They produce infrared-A and infrared-B radiation that penetrates tissue more deeply — as Arcadia Reptile's heating research explains, halogen bulbs emit an IR spectrum closer to natural sunlight, while under-tank heaters and ceramic heat emitters produce primarily infrared-C, which warms the contact surface but doesn't penetrate as effectively. The difference matters for digestion and overall thermoregulation.
Mount the basking bulb on one end of the enclosure. You want a hot spot on the floor (88-92°F) with a gradient that drops to the mid-70s on the cool side. Use a temperature gun — not a stick-on dial thermometer — to measure surface temperatures directly. Dial thermometers lie. They read air temperature somewhere vaguely near where they're stuck, and air temp doesn't tell you what the gecko's belly is touching.
Night heating: most rooms stay above 65°F, which is fine. If your house drops below that, a ceramic heat emitter on a thermostat handles nighttime without producing light.
Step 3: The Three-Hide System
Three hides. Not two. Not one with a big opening.
Warm hide — sits directly under or near the basking spot. This is the digestion zone. After eating, your gecko parks here for hours.
Cool hide — opposite end. The retreat. Where the gecko goes when it's done basking or just wants lower stimulation.
Humid hide — warm side, filled with damp sphagnum moss or paper towel. This is what makes or breaks shedding success. The interior should feel noticeably moist — 70-80% humidity inside, while ambient stays around 30-40%. Re-dampen every two to three days. Replace the moss weekly to prevent mold.
A phone consultation I had last month involved a keeper whose gecko had lost two toes to retained shed. They had two hides — warm and cool — and couldn't figure out what was going wrong. No humid hide. That's all it was. Two toes gone because of a missing container with some wet moss.
Each hide should be snug. Leopard geckos feel secure when their back touches the ceiling of the hide. Oversized hides don't provide that contact and the gecko may avoid them.
Step 4: Substrate
This is the most argued-about topic in leopard gecko keeping, and I've changed my own position over the years.
Safe options: Slate tile, textured ceramic tile, non-adhesive shelf liner, paper towel (functional but ugly), or a 70/30 organic topsoil-to-play sand mix for adult geckos only.
Avoid: Calcium sand (marketed as "digestite" — it's not), pure fine sand for juveniles, walnut shell, reptile carpet (harbors bacteria and catches tiny claws).
I keep my adults on slate tile with a dig box of topsoil/sand mix in one corner. The tile holds heat from the basking lamp, is trivially easy to clean, and gives the gecko traction. The dig box satisfies their occasional urge to excavate without creating an impaction risk across the whole enclosure.
Juveniles under six months go on paper towel. Period. Their aim with prey is worse than adults, and they'll ingest loose substrate accidentally. Once they're large enough that an accidental mouthful of soil isn't a medical event, you can switch.
Step 5: Water, Decor, and Finishing Touches
A shallow water dish — heavy enough not to tip — with fresh water daily. Some geckos drink from it, some rarely do. Doesn't matter. It needs to be there.
Enrichment transforms the setup from a box into a habitat. Cork bark flats and rounds give climbing opportunities. Low stone stacks (siliconed for stability) create ledges. A background on three sides of the glass reduces reflection stress and makes the gecko feel less exposed.
Avoid fake plants with small detachable parts — geckos tongue-flick everything, and a piece of plastic leaf in the digestive tract is a vet visit you don't want. Live plants like sansevieria or haworthia work in larger setups if the lighting supports them.
Once the enclosure is assembled, run it for 48 hours before adding the gecko. Monitor temperatures at multiple points — hot spot, cool side, inside each hide — and make adjustments with the thermostat. You want stability before a living animal depends on it. The exotic pet habitat setup fundamentals walk through these universal pre-launch checks if you're doing this for the first time.
And then dial in the feeding schedule and gut-loading methods to match the setup. A great enclosure paired with poor nutrition still produces a sick gecko.
Frequently Asked Questions
Can I use a heat rock?
No. Heat rocks have no internal thermostat and create localized hot spots that cause thermal burns. They're one of the most common causes of belly burns in reptiles. Use overhead heating or a thermostat-regulated heat mat — never a heat rock.
How often should I replace the humid hide substrate?
Weekly. Sphagnum moss holds moisture well but becomes a mold risk after about seven days in a warm environment. I pull the old moss, rinse the container with hot water, and pack in fresh. Takes two minutes.
Does the enclosure need a screen top for ventilation?
Some airflow is needed to prevent stagnant, overly humid conditions, but you don't want so much ventilation that you can't hold temperatures. Most purpose-built reptile terrariums balance this with partial screen panels. If you're converting an aquarium, a screen top works — just account for heat loss when sizing your bulb.
Where should I put the enclosure in my room?
Away from windows (direct sunlight overheats the tank unpredictably), away from air vents (drafts crash cool-side temps), and at a height where normal foot traffic doesn't startle the gecko constantly. A bedroom or office shelf works well. The room should stay above 65°F year-round.