

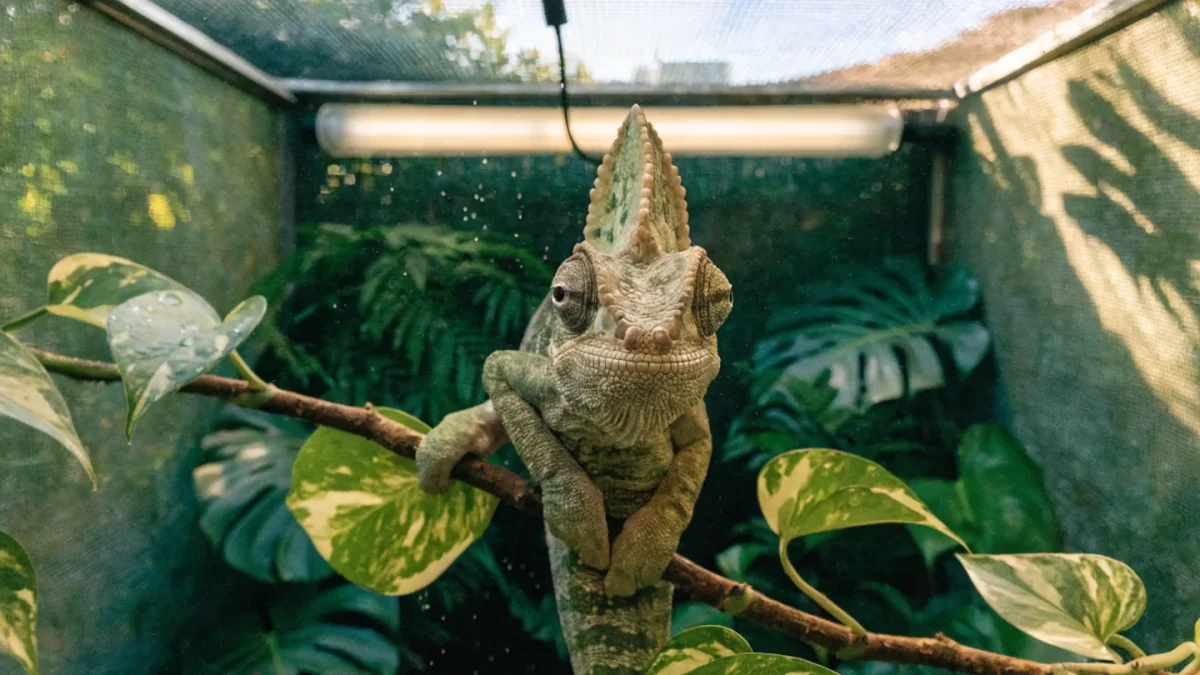
I walked through a pet store about two years ago and stopped at a chameleon display. Glass tank, no plants, a shallow water dish in the corner, a single compact UVB coil mounted inside, and a juvenile veiled chameleon sitting at the bottom of the enclosure — not climbing, not basking, just sitting on the glass floor. Everything about that setup was wrong, and the animal was already paying for it.
A chameleon enclosure needs to be a tall mesh cage with live plants, a functioning drainage system, and lighting that provides both heat and UVB from above. Getting these four elements right before bringing the animal home prevents the majority of health problems chameleons develop in captivity.
Step 1: Choose the Right Cage
Mesh. Not glass. Not acrylic. Mesh allows airflow, which prevents the stagnant humid conditions that cause respiratory infections — one of the top killers of captive chameleons. Both veiled and panther chameleons need this same ventilation.
For adult males of most commonly kept species, the minimum cage size is 60 cm wide × 60 cm deep × 120 cm tall (24" × 24" × 48"). Height matters more than floor space. Chameleons are arboreal — they spend their lives climbing, and their instinct in the wild is to move upward when threatened. A chameleon trapped in a low, wide enclosure is a stressed chameleon.
Females can manage in a slightly smaller cage — 45 cm × 45 cm × 90 cm (18" × 18" × 36") — but bigger is always better, and you'll never regret going larger.
There's one exception to the mesh-only rule. If your home sits below 30% ambient humidity year-round — common in arid climates or homes with aggressive heating systems in winter — a fully mesh cage may bleed humidity faster than you can replenish it. In that case, a hybrid enclosure with two or three solid sides and one mesh panel (typically the front) can help retain moisture while still allowing adequate airflow. I've used this approach for keepers in the desert southwest, and it works if you're vigilant about monitoring ventilation.
Step 2: Build the Interior Framework
Branches form the climbing highway. Use a mix of diameters — thin branches (roughly the diameter of the chameleon's grip) for walking and thicker branches or dowels for basking perches. Position the main basking branch 15-20 cm below the basking light, not directly under it. The chameleon needs to warm itself without being able to touch the fixture.
Arrange branches at multiple heights and angles. Horizontal runs, diagonal climbs, and a few vertical sections give the animal choices. I zip-tie branches to the cage frame at the corners — stable attachment points that don't shift when a 150-gram chameleon walks across them.
One thing I've learned the hard way: avoid placing any perch or branch within 15 cm of the UVB tube. Chameleons will park themselves at the closest available point to the light source for hours. Too close, and they can develop photo-keratoconjunctivitis — essentially a UV sunburn on their eyes. It's painful and requires veterinary treatment.
Step 3: Add Live Plants
Live plants aren't decoration. They're infrastructure.
Pothos (Epipremnum aureum) is the workhorse. It grows aggressively in the warm, humid environment inside a chameleon cage, drapes over branches to create visual barriers, and holds water droplets on its waxy leaves. Chameleons drink off those droplets. I start every new enclosure with at least two pothos plants.
Ficus benjamina provides a woody trunk and dense leaf canopy. It's non-toxic and can support the weight of even a large adult male. The downsides: ficus drops leaves when stressed by changes in light or position, and the sap can be mildly irritating. Once it's established and you stop moving it, the leaf drop calms down.
Schefflera arboricola (umbrella plant) has sturdy branches and broad leaves that collect misting water well. It handles the humidity and fills out the middle and lower sections of the cage. A single large schefflera can transform a sparse-looking cage into something that actually resembles habitat.
Hibiscus is safe and adds visual interest. Veiled chameleons will sometimes eat the flowers and leaves, which is fine — it's one of the few plants they nibble on.
Avoid anything toxic. Dieffenbachia, philodendron, and ivy are common houseplants that don't belong in a chameleon cage. If you're unsure about a plant, leave it out. Wash any nursery plant thoroughly before introduction — nurseries spray pesticides, and what's safe for a potted plant on a windowsill can be lethal for a reptile living in direct contact with the foliage.
Step 4: Set Up Drainage
You're going to be misting this enclosure at least twice daily for several minutes per session. That's a lot of water. Without drainage, it pools at the bottom, grows mold, and creates exactly the kind of bacterial soup you're trying to avoid.
The simplest approach: remove the cage's bottom panel (most mesh cages have a solid bottom tray) and set the cage on a drainage pan or a table with a hole drilled for a bucket underneath. Some keepers use a PVC stand with a collection reservoir. Others use a large plastic tray lined with paper towels that they swap out daily.
If you're using a substrate — and I'd recommend against it for most setups because it complicates drainage and can harbor parasites — make sure it doesn't sit in standing water. Bioactive setups with a proper drainage layer (clay balls or similar beneath soil) can work, but they add complexity that isn't necessary for a healthy chameleon enclosure.
My personal setup uses a bare-bottom cage on a raised stand, with a plastic tray underneath that drains through tubing into a 5-gallon bucket. I empty the bucket every few days. Not glamorous, but it's functional and keeps the bottom of the cage dry.
Step 5: Install Lighting
Two fixtures go on top of the mesh. Not inside the cage. On top.
Basking light: a standard incandescent or halogen flood bulb aimed at the main basking branch. Wattage depends on how far the bulb sits from the branch and your room's ambient temperature — start with 60W and adjust. You want the basking perch to read 32-35°C for veiled and panther chameleons. Jackson's chameleons need it cooler, around 29-30°C. Use a thermometer probe at the actual basking spot, not a stick-on thermometer across the room.
UVB: a linear T5 high-output tube spanning at least two-thirds of the cage length. Mount it directly on the mesh. The mesh filters some UV output, so proximity matters. The basking branch should be 15-20 cm below the UVB source. Too far, and UVB intensity drops below therapeutic levels; too close, and you risk eye damage.
No colored bulbs. No "night lights." No ceramic heat emitters during the day. A clean white basking bulb and a quality UVB tube — that's the complete lighting package. The habitat setup fundamentals page covers the reasoning behind these lighting choices if you want the deeper explanation of how UVB intensity, distance, and mesh filtering interact.
Step 6: Add a Misting System and Dripper
Your enclosure needs a reliable hydration system before the chameleon arrives. A handheld spray bottle will work temporarily, but you won't keep up with it long-term. Automated misters are an investment — 50-150 — but they pay for themselves in consistency. Set timers for at least two misting sessions daily, 2-5 minutes each, timed to coincide with the lights-on period.
A drip system supplements the misting. A simple container with a pinhole in the bottom, positioned on top of the cage so water drips slowly onto a leaf below, gives the chameleon a sustained water source over several hours. I run drippers during the morning for about two hours.
Final Check Before Adding the Animal
Run the enclosure empty for at least three days. Confirm that:
- Basking temperature hits your target range
- Ambient temperature on the cool side stays below 27°C
- Humidity after misting rises to 60-80% and gradually drops between sessions
- Drainage handles the water volume without pooling
- UVB tube is positioned correctly and securely
- All branches are stable enough to support the animal's weight
I also recommend placing a digital hygrometer/thermometer combo unit at basking height and another at the bottom of the cage. The reading difference between them tells you whether your gradient is actually working. Refer back to chameleon care requirements for species-specific parameter targets.
Frequently Asked Questions
Can I use a glass terrarium if I add a fan?
I've seen people try this. A fan improves airflow in glass, but it doesn't replicate the passive ventilation of a mesh cage. The air exchange pattern is different — forced airflow in one direction versus ambient circulation from all sides. If glass is your only option, remove the top entirely and point a small fan across the opening on a low setting. But honestly, mesh cages of the right size cost about the same as equivalent glass terrariums. Start with the right housing.
How often should I replace the live plants?
When they die or outgrow the cage. Pothos is nearly indestructible under chameleon conditions and may need trimming rather than replacing. Ficus can struggle if it doesn't get enough light beyond the UVB — supplementing with a plant-spectrum LED helps. I've had the same schefflera in one of my cages for over four years. Rotate or replace plants if they show signs of pest infestation or decline, but healthy plants in a well-maintained cage last indefinitely.
Do I need substrate at the bottom of the cage?
For most keepers, no. A bare bottom with a drainage tray is simpler, more hygienic, and easier to monitor. Substrate adds a place for feeder insects to hide, can harbor parasites and bacteria if not maintained properly, and complicates the drainage system. Bioactive substrates — with a proper drainage layer, soil blend, and a clean-up crew of isopods and springtails — work well for experienced keepers who want a naturalistic look, but they're an advanced setup that adds cost and maintenance.